
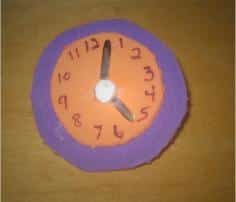
Clock Neckerchief Slide
This clock neckerchief slide is a fun and easy project for Cub Scouts. It helps them practice cutting, gluing, and using small tools like brads. This type of project fits well with Cub Scout activities because it is simple and hands-on. Scouts can make it on their own with a little help from an adult. It is a good way to keep their hands busy and their minds focused.
This project works well with a time based theme like the Turn Back the Clock theme. You can use it as a gathering activity at the start of a den meeting. It also works as a craft to go with a lesson about time, daily schedules, or history. You can talk about how clocks have changed over time and what it means to “turn back the clock.”
Scouts enjoy wearing neckerchief slides they made themselves. It gives them a chance to show their creativity. Each Scout can choose their own colors and make a unique design. When they wear the slide, it reminds them of what they made and the fun they had doing it. It also helps them feel like part of the group.
This project teaches more than just crafting. It shows Scouts how to follow instructions and finish a task. They also learn to work carefully and be proud of their work. It’s a small project, but it helps build important skills. Leaders can use it to teach, to celebrate themes, or just to make a meeting more fun.
Tick-Tock Goes the Cub Scout Craft
The clock neckerchief slide is a fun spin on a Scouting tradition. Cub Scouts have been making neckerchief slides for many years. These slides help hold the neckerchief in place, but they also give Scouts a way to show off their creativity. Over time, leaders and Scouts started making slides that match the themes of meetings or seasons. The clock slide is one of those special themed crafts.
No one knows exactly who made the first clock neckerchief slide. It likely started as a craft idea to go along with a time-related theme. Some Cub Scout packs use the “Turn Back the Clock” theme in the fall, around daylight saving time. Others use it to talk about history, old tools, or stories from the past. The clock slide fits well with any of those ideas.
The clock neckerchief slide is now a favorite with leaders looking for an easy, meaningful project. It takes only a few simple materials, and each Scout can decorate it in their own way. Making the clock hands move with a brad also makes the slide more fun. It reminds Scouts that time matters—and that they can learn a lot in just a little time together.
What This Craft Really Teaches
When your Cub Scouts make this clock neckerchief slide, they are learning more than just how to cut and glue. They are learning how to follow steps in order. That may seem simple, but it is an important skill. Many of the things they do in life will ask them to go step by step. This project gives them a way to practice that in a fun setting.
They also learn how to work with their hands. Cutting circles, lining things up, and using a small brad takes focus. These actions help build fine motor skills. It may not seem like much, but using scissors and tiny parts helps young Scouts build control and confidence with tools.
Scouts also learn to be creative. They can pick their colors. They can place the clock hands any way they want. Some might make a silly time. Some might show their favorite time of day. That’s OK. This is their slide, and letting them choose makes the project personal and fun.
Last, this project teaches them to be proud of their work. They make something useful and wear it. It shows that what they create has value. When they wear it to a meeting or event, they remember they did something by themselves. It builds self-esteem and makes them want to try more crafts and challenges.
Clock Neckerchief Slide Project Instructions
Materials Needed:
- Pencil
- Craft foam (two colors that look good together)
- Scissors
- Fine point marker
- White glue or tacky glue
- Brad fastener (also called paper fastener)
- Small piece of leather lacing or chenille stem
- (Optional) Very small foam circle to cover the brad
Instructions:
- Use the pencil to trace two circles on the craft foam. One should be about 2 inches wide. The other should be about 1½ inches wide.
- Cut out both circles with scissors.
- Use the marker to write the numbers 1 through 12 on the smaller circle like a clock.
- Glue the smaller circle onto the center of the larger circle.
- From the back side, push the brad through the center of both circles. This makes the clock hands. Bend the prongs on the back so the brad stays in place.
- (Optional) Glue a very small foam circle over the center of the clock to cover center of the brad.
- Make a loop with leather lacing or a chenille stem. The loop should be about ½ inch wide so a neckerchief can fit through.
- Glue the loop to the back of the clock slide.
- Let the glue dry completely before using the slide.
Extra Tips:
- You can make stencils ahead of time to help Scouts draw better circles.
- Use school glue or tacky glue. Avoid hot glue unless an adult is helping.
- Always have scissors use supervised, especially with younger Scouts.
- Each Scout can set their clock hands to a time they choose. This can lead to a fun discussion or game.

More Resources

Projects for Scouts
If you are looking for more simple and fun ideas like the Clock Neckerchief Slide, check out the Projects for Scouts page on my website. You’ll find all kinds of hands-on activities there. These projects are great for Cub Scouts, Scouts BSA, and even Venturers. Most use common supplies and work well for den meetings, troop activities, or campouts.
On that page, you’ll find crafts, STEM ideas, camp gadgets, and other useful projects. Each one is explained in clear steps with tips to help you lead it. Whether you want to build something useful or just have a creative activity ready, you’ll find lots of options. Take a look and try one with your Scouts.

Frequently Asked Questions for the Clock Neckerchief Slide
What age group is this project best for?
This project works well for Cub Scouts, especially Wolves and Bears. Webelos can also enjoy it. Younger Scouts may need some help with cutting and gluing.
Do the clock hands really move?
Yes. The brad fastener lets the clock hands move. Scouts can set the hands to different times. They can choose a time that means something to them.
What kind of glue should we use?
Use white glue or tacky glue. Hot glue also works, but only if an adult helps. Make sure to let it dry before wearing the slide.
Can we use something besides craft foam?
Yes. You can use cardboard, felt, or craft foam sheets. Just make sure the material is easy to cut and not too heavy.
How long does this project take?
Most Scouts can finish in about 10 to 20 minutes. It may take longer if they decorate more or need extra help.
What if a Scout’s clock slide falls apart?
Check the glue and brad. If needed, re-glue the pieces or replace the brad. You can also add a bit of hot glue to make it stronger.
Time Well Spent
The Clock Neckerchief Slide is a simple project that brings learning and fun together. Scouts use foam, glue, and a brad fastener to make a clock face they can wear. It fits with many meeting themes like time, history, or daily schedules. Each Scout picks their own colors and time, so every slide is unique.
This project teaches basic skills like cutting, gluing, and following steps. It also helps with fine motor control and learning how to finish a task. Scouts feel proud when they wear their finished slide. It is something they made with their own hands.
Leaders like this craft because it is easy to plan and doesn’t cost much. It fits well into a short meeting and can be a gathering activity or a main project. It is also a great way to start a talk about how we use our time.
Scouts take home something useful and fun to wear. They also build confidence and learn new skills. It’s a good way to mix learning with hands-on fun. And best of all, it keeps them excited to come back and do more.
Leave a Reply